25. Live MIDI Effect Reference
Live comes with a selection of custom-designed, built-in MIDI effects. The Working with Instruments and Effects chapter (see ‘Working with Instruments and Effects’) explains the basics of using effects in Live.
25.1 Arpeggiator

Live’s Arpeggiator effect takes the individual MIDI notes from a held chord (or single note), and plays them as a rhythmical pattern. The sequence and speed of the pattern can be controlled by the device, which also provides a full complement of both classic and original arpeggiator features.
Arpeggiators are a classic element in Eighties synth music. The name originates with the musical concept of the “arpeggio,“ in which the notes comprising a chord are played as a series rather than in unison. “Arpeggio“ is derived from the Italian word “arpeggiare,“ which refers to playing notes on a harp.
25.1.1 Style and Rate Sections
Arpeggiator’s Style chooser determines the sequence of notes in the rhythmical pattern.


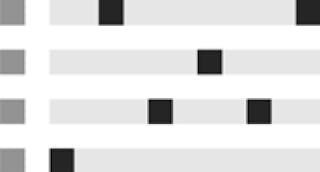


Play Order places notes in the pattern according to the order in which they are played. This is therefore only recognizable when more than one chord or note has been played.
In addition to the Arpeggiator styles above, there is a Chord Trigger mode which repeats the incoming notes as a block chord, as well as three settings for creating random arpeggios:
- Choosing Random will produce a continuously randomized sequence of the incoming MIDI notes.
- Random Other creates random patterns from incoming MIDI notes, but will not repeat a given note until all other incoming notes have been used.
- Random Once creates one random pattern from incoming MIDI notes and repeats that pattern until the incoming MIDI changes, at which point a new pattern is created.
Arpeggiator will play the pattern of notes at the speed set by the Rate control, which can be calibrated in either milliseconds or beat-time using the neighboring Sync/Free button. With Sync chosen, Arpeggiator will be synced to the song tempo.
A Gate control to the right of Rate determines the length of notes played by Arpeggiator as a percentage of the current Rate setting. Any setting larger than 100% will therefore play notes that overlap (i.e., are legato).
The rhythmic pattern generated by Arpeggiator does not necessarily have to be straight; a selection of groove patterns can be applied with the respective control just beneath the Mode chooser. Grooves in Arpeggiator behave similarly to grooves in clips, and the intensity of the groove is determined by the Amount slider in the Groove Pool (see ‘Groove Pool’).
With the Hold parameter active, Arpeggiator will continue to play the pattern even after the keyboard keys have been released. The pattern will be repeated until any other key is pressed. When Hold is active and any of the original keys also remain physically held, notes can be added to the pattern simply by playing them. Notes can also be removed from the pattern in this scenario by playing them a second time, allowing the gradual buildup and rearrangement of the pattern over time.
Tip: If you want the pattern to stop playing, momentarily deactivate Hold.
The Offset parameter shifts the sequence of notes in the pattern by the number of places selected with the control. This is best illustrated with an example: A setting of “1“ makes the second note in the pattern play first, and the first note last. If you imagine the pattern as a circle of notes that is played in a clockwise direction from a set start point, the Offset parameter effectively rotates this circle counter-clockwise one note at a time, changing where in the pattern play begins.
With the Repeats parameter, the pattern can be set to repeat a specified number of times until it is retriggered. A setting of “inf“ will repeat the pattern indefinitely. Hint: This feature provides an excellent way of emulating the strum of a guitar or playing a chord as an arpeggio once or twice. Another interesting effect can be achieved by combining this feature with the Retrigger parameter, which we will explain in a moment. This can be used to create rhythmically generated arpeggios separated by pauses.
The Retrigger parameter resets the pattern so that it starts again from the beginning. Retriggering can be deactivated (Off), set to occur when new notes are pressed (Note) or set to occur at a specified song position or beat-time (Beat). Beat retriggering can be specified in terms of notes or bars and is aligned with song position. An LED in the upper right corner of the section indicates when the pattern has been retriggered.
25.1.2 Transposition and Velocity Sections
The pattern generated by Arpeggiator can be transposed; the device’s transposition controls allow forcing this transposition into a specific major or minor key or (using the Transpose chooser’s Shift option) doing it in semitones. The distance between transposition steps is set in scale intervals (for Major and Minor transposition) or semitones (for Shift transposition) with the Distance control. Using the Steps parameter, you can choose the number of times the sequence is transposed. When Distance is set to a positive value, a setting of 8 Steps will transpose the sequence a total of eight times, playing it in higher notes each time. (When Distance is set to a negative value, the sequence will transpose lower each time.)
The dynamics of Arpeggiator are controlled using the velocity section. With Velocity set to “On“ and Target set to 0, for example, the sequence will gradually fade out, eventually reaching 0 velocity. The Decay control sets the amount of time Arpeggiator takes to reach the Target velocity. With Retrigger activated, retriggering of the sequence will also retrigger the velocity slope.
Tip: The velocity section’s Retrigger option can be used in conjunction with Beat retriggering to add rhythm to the dynamic slope.
25.2 Chord
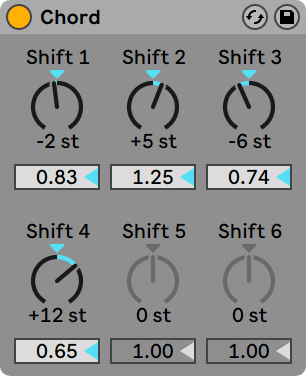
This effect assembles a chord, as the name implies, from each incoming note and up to six others of user-defined pitch. The Shift 1-6 knobs allow selecting the pitch of the notes that contribute to the chord from a range of +/- 36 semitones relative to the original. Setting Shift 1 to +4 semitones and Shift 2 to +7 semitones, for example, yields a major chord in which the incoming note is the root.
The Velocity control beneath each Shift knob makes further harmonic sculpting possible, given that the instrument allows for changes in volume or timbre as function of velocity. It is a relative control, with a range of 1 to 200 percent (100 percent defined as playing at a velocity equal to that of the incoming MIDI note). Use the Velocity controls to do anything from adding slight overtones to washing out most of the other chord elements.
The order in which pitches are added to the chord is inconsequential: The effect of a +12 semitone shift added with the Shift 1 control, for example, is equal in effect to a +12 semitone shift added with the Shift 6 control.
Note that no two notes of the same pitch can contribute to the chord, and that selecting the same shift value twice (e.g., +8 semitones on both Shift 2 and Shift 3) will result in the latter control appearing disabled, indicating that it is a duplicate and therefore not in use. Actually, there is no such thing as two notes with the same pitch playing at the same time within the entire Live universe.
25.3 Note Length
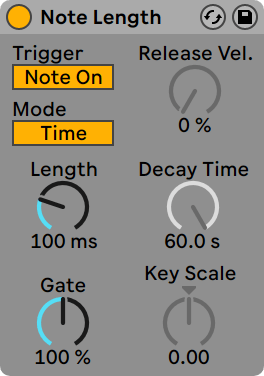
Note Length alters the length of incoming MIDI notes. It can also be used to trigger notes from MIDI Note Off messages, instead of the usual Note On messages.
When the device is set to trigger from a Note On message, only the timing controls are available. The length of held notes can be adjusted in milliseconds or synced in relation to the song tempo. Gate defines the percentage of the Length value that notes should be held for. At 200 percent, the Gate parameter will double a note’s length.
When the device is set to trigger from a Note Off event (the moment at which a played note is released), the timing of an incoming note will be delayed by its length (because it will be starting at the point at which it would have been stopping). Note Length’s other settings will then determine the duration of the newly triggered note.
Three other parameters are available when the device is triggering from Note Off messages:
On/Off Balance — This determines the velocity of the output note. It is a balance between the incoming note’s Note On and Note Off velocities. If your MIDI keyboard does not support MIDI Note Off velocity, you can just set this to zero.
Decay Time — This is the time needed for an incoming note’s velocity to decay to zero. The decay begins immediately from the moment the device receives a MIDI Note On message. The value at the time of Note Off will become the velocity of the output MIDI note.
Key Scale — The pitch of incoming notes can be used to alter the length of the output notes. With positive values, notes below C3 will be made progressively longer, and notes above C3 will be made shorter. Negative values will invert this relationship.
25.4 Pitch
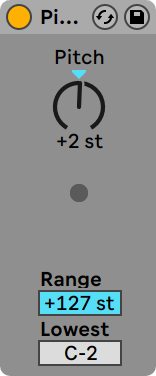
Pitch is a transposition tool that changes incoming note pitch by +/- 128 semitones.
The Range and Lowest controls act together to define a pitch range through which notes are allowed to pass. Notes outside of the defined pitch range will be blocked, and the effect’s LED light will flash when this happens.
Notes outside of the pitch range are limited based on their untransposed pitch, prior to the transposition stage of the effect.
25.5 Random
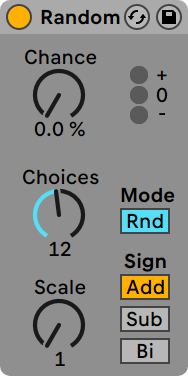
Random adds an element of the unknown to the otherwise commonplace pitch parameter. The Chance control defines the likelihood that an incoming note’s pitch will be changed by a random value. You can think of it as being something like a dry/wet control for randomness.
The random value that determines the pitch change is created by two variables: The Choices control defines the number of different random notes possible, from a range of 1 to 24; the Scale control value is multiplied by the Choices control value, and the result dictates the pitches that random notes are allowed to have relative to that of the incoming note.
For example, if you play the note C3 with Chance set to 50 percent, Choices set to 1 and Scale set to 12, half of the resulting notes will play at C3 and half will play at C4. But with Chance set to 50 percent, Choices set to 12 and Scale set to 1, half of the resulting notes will play at C3 and half will play at one of any semitone that is between C#3 and C4.
These examples assume that the Sign buttons are set to “Add“ and the Mode button is set to “Rnd.“ The Sign controls decide whether the random alteration adds to the original note’s pitch, subtracts from it, or does a little of both. The LEDs above the Sign controls give you a visual idea of how output pitch compares with that of the original.
The Mode button determines whether the alteration will be random or, when set to “Alt,“ will cycle between the allowed output notes in a fixed order (sometimes known as “cycle round-robin“). The Chance control behaves a bit differently in Alt mode - at 100 percent, the next output note will always be the next note in the series. At 0 percent, the next output note will always be the incoming note.
For example, with Chance set to 100 percent, Choices set to 12 and Scale set to 1, playing C3 once will trigger C3, and each successive C3 will trigger the next semitone higher until the device reaches C4, at which point it will start over at C3. But with Chance set to 100 percent, Choices set to 2 and Scale set to 2, incoming C3s will alternate between C3 and D3. This setting is perfect for simulating upbow and downbow alternation with stringed instruments, or alternating right- and left-hand drum samples.
Hint: Try using the Scale effect after Random to constrain the output values to a specific harmonic range. Using Random’s Alt mode with the Scale device allows you to create a simple step-sequencer.
25.6 Scale
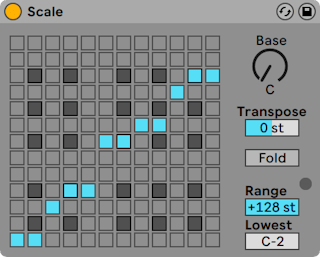
Scale alters incoming note pitch based on a scale mapping. Each incoming note is given an outgoing equivalent on the X-Y scale map of the effect: All incoming Cs, for example, might be converted to outgoing Ds.
The X-Y scale map is 12 squares in length and width, corresponding to the 12 notes in a full octave. Darker squares represent the black keys on a keyboard. The base of the diagonal scale (the lower left square) shown on the map can be changed using the Base control. The X-axis of the map shows incoming note values, and the Y-axis their outgoing equivalents. Use mouse-clicks to move or delete the blue squares, which define where an incoming note will be sent on the scale. (Deleting a note on the scale map means that it will no longer play.)
The Transpose slider can raise or lower the pitch of incoming MIDI notes by +/- 36 semitones. You could, for example, shift a melody written in C major to G major by setting Transpose to +7 st.
Fold makes it more convenient to create scales by automatically “folding“ back notes if their offset to the original note is greater than six semitones. For example, if Scale normally maps an incoming C3 to A3, enabling Fold will map C3 to A2 instead.
The Range and Lowest controls work together to define the note range within which scale mapping will take effect. Outside of the range defined by these controls, the Scale effect will be inapplicable, and the LED light will flash to indicate that some notes are not being processed by the effect, but are playing at their unaltered pitch.
25.7 Velocity
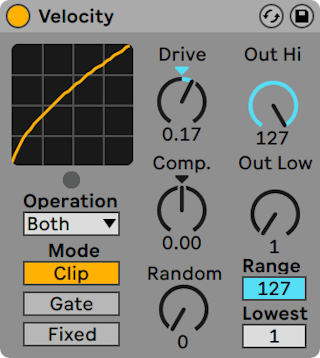
Velocity can alter incoming MIDI note velocity values (1-127) in either a controlled or random manner. It can function on MIDI Note On (Velocity) or Note Off (Rel. Vel.) messages, or both, depending on the setting of the Operation chooser.
The Out Low and Out Hi knobs control the outgoing velocity (from 1 to 127), which is represented by the Y-axis of the X-Y display. Incoming velocities that are shown in the display are within the range chosen by the Range and Lowest controls, and are represented on the X-axis. The resulting curve shows how velocity is being altered by the effect.
If Lowest and Out Low are both set to zero, and Range and Out Hi are set to 127, the display will show a straight diagonal line that indicates the equivalent of an effect bypass: Softly played notes are being output quietly, and vice versa. If instead, Out Hi is set to zero and Out Low to 127, the slope of the line will be reversed, and softly played notes will actually produce the loudest output.
What happens to incoming notes that are outside of the range set with the Range and Lowest controls? This depends on which Mode is selected.
- Clip Mode does just what it says: It clips incoming note velocities so that they stay within the range.
- Gate Mode removes incoming notes altogether if their velocities are outside of the range. You will see the little LED below the X-Y display flash when a note is blocked by gating.
- In Fixed Mode, the Out Hi velocity defines all outgoing note velocities, regardless of incoming note velocity.
The Random function adds or subtracts a random value to the all velocities, and is represented by a gray area on the display curve.
The Drive and Compand controls can be combined to create more complex curves. Compand is a simultaneous expanding and compressing tool. When set to values greater than zero, it forces incoming notes to the outer boundaries of the curve, making them play either loudly or softly. Compand values of less than zero, on the other hand, force outgoing velocity toward the mid-range. Drive pushes all values in the curve to the outer extremes. Use these two controls together to sculpt or even redefine the dynamic structure of a piece.