9. Audio Clips, Tempo, and Warping
Unlike music stored on tape or in a traditional digital audio workstation, the music in Live remains “elastic“ at all times. Live is capable of time-warping samples while streaming them from disk so as to synchronize them to the current Live Set’s tempo. This happens without affecting the pitch, which can be changed independently. Mixing and matching audio from different origins is therefore extremely easy.
9.1 Tempo
9.1.1 Setting the Tempo

The Control Bar’s Tempo field allows you to change the playback tempo of your Live Set at any time, in real time. You can even automate the tempo (see ‘Editing the Tempo Automation’) to create smooth or sudden tempo changes along the song timeline. For maximum tempo control during performance, you can MIDI map (see ‘MIDI and Key Remote Control’) separate controllers to the Tempo field on both sides of the decimal point. Setting one knob to control coarse tempo in BPM and another to control fine tempo in hundredths of a BPM allows for enough precision to adjust to live performers or other unsynchronized sources.
You can have an external sequencer (or drum machine) play along with Live or have Live play along with the sequencer. The respective settings are made in the Link/Tempo/MIDI Preferences. Please refer to the chapter on synchronization (see ‘Synchronizing with Link, Tempo Follower, and MIDI’) for details.
9.1.2 Tapping the Tempo

You can use Live’s Tap Tempo function to set the tempo at any time. As you click the Control Bar’s Tap Tempo button once every beat, the tempo of the Live Set will follow your tapping.

You can also assign the Tap button to a computer key instead of using the mouse. Click on the Control Bar’s KEY switch to enter Key Map Mode; then select the Tap button; press the key you would like to use for tapping; click the KEY switch again to leave Key Map Mode. The assignment will take effect immediately. The Tap button can also be assigned to a MIDI note or controller, like a foot switch, in a similar fashion. Although Live responds to your tapping immediately, it does apply some degree of inertia to prevent sluggish behavior in the software. The more taps Live receives in a row, the more precisely it will be able to conclude the desired tempo.
If the “Start Playback with Tap Tempo” button is enabled in Live’s Record/Warp/Launch Preferences, you can also use tapping to count in: If you are working in a 4:4 signature, it takes four taps to start song playback at the tapped tempo. Starting playback of Live’s transport by tapping the tempo will automatically adjust the playback position of any apps that are connected via Ableton Link (see ‘Setting up Link’). This ensures that those apps remain tempo synced, and also at the correct position in the musical phrase.
9.1.3 Nudging the Tempo

Although Live can be easily synchronized via Link or to external MIDI devices (see ‘Synchronizing with Link, Tempo Follower, and MIDI’), you may find yourself in situations in which you need to adjust to sources that aren’t locked to one tempo, such as live musicians or turntables. As long as your Set’s tempo is basically the same as that of the unsynchronized material, you can use the Phase Nudge Up/Down buttons to temporarily speed up or slow down Live’s playback to match what you hear. As with the Tap button, these buttons are much easier to use when mapped to MIDI controllers.
9.2 Time-Warping Samples
Live’s ability to play any sample in sync with a chosen tempo is a unique and important feature. In addition, you can “warp“ the rhythmic flow of a piece, changing its “feel,“ or even move notes to other meter positions.
An audio clip’s warping properties are set in the Audio tab/panel (see ‘The Audio Tab/Panel’), which is a sub-section of the Clip View.

The most significant control here is the Warp switch, which toggles an audio clip’s warping on or off. The Warp section of Live’s Preferences will determine the default warp settings for new clips, but they can always be overridden here on a per-clip basis.
When the Warp switch is off, Live plays the sample at its original, “normal“ tempo, irrespective of the current Live Set’s tempo. This is useful for samples that have no inherent rhythmic structure: percussion hits, atmospheres, sound effects, spoken word and the like. Turn the Warp switch on to play rhythmically structured samples (such as sample loops, music recordings, complete music pieces, etc.) in sync with the current song tempo.
To direct Live’s assumptions about new samples, use the Record/Warp/Launch tab of Live’s Preferences. If the Auto-Warp Long Samples preference is on, Live assumes that long samples contain music that should be played in sync with the Live Set’s tempo. If you would rather have Live default to playing long samples as they are, disengage this preference.
9.2.1 Tempo Leader/Follower
All warped clips in the Arrangement View have one further option: They can be defined as tempo leaders by toggling their Leader/Follower switches. Any number of clips can be set as tempo leaders, but only one clip at a time can actually be the tempo leader. This distinction is always granted to the bottom-most, currently playing clip in the Arrangement View.
The clip that is the current tempo leader will play as if warping was off, but with one important difference — the rest of the Live Set will be warped so that it plays in sync with the current tempo leader.
This is achieved by adding tempo automation to the Master track for the duration of the tempo leader clip. You will notice that the Tempo field in Live’s Control Bar becomes disabled in this state; this is because all tempo control is handed over to the tempo leader clip.
When toggling a clip’s Leader/Follower switch, or when deleting a clip that was set as tempo leader, the Master track tempo automation is removed again, restoring the proper tempo to the region. If you wish instead to keep the generated tempo automation to continue working with it, then right-click(Win) / CTRL-click(Mac) on the Control Bar’s Tempo field, and choose the Unfollow Tempo Automation command. All clips will then be set to Follower, but the tempo automation will remain in place.
Note that when Live’s EXT switch is enabled (see ‘Synchronizing External MIDI Devices to Live’), the Leader/Follower switch has no effect and appears disabled).
9.2.2 Warp Markers
Think of a sample as a rubber-band that you want to pin to a (musical time) ruler. In Live, the pins are called Warp Markers. A Warp Marker locks a specific point in the sample to a specific place in the measure. You can use any number of Warp Markers to create an arbitrary mapping of the piece’s inherent rhythm to a musical meter.
Warp Markers are set in the Clip View’s Sample Editor by double-clicking in the upper half of the sample. They can then be dragged or moved with the arrow keys to different points in time. Warp Markers can also be deleted by double-clicking them, or by pressing the computer keyboard’s Backspace or Delete key after selecting them.

When working with your clip, you can have Live scroll the Sample Editor to follow playback. Use the Control Bar’s Follow switch to activate this feature. (Note that Follow will pause if you make an edit in the Sample Editor. Follow will start again once you stop or restart playback, or click in the Arrangement or clip scrub area.)
It also might be helpful to vertically resize the Sample Editor by dragging on the split line between the Clip View and the Session View track area.

9.2.2.1 Transients and Pseudo Warp Markers
When you first load a sample into Live, Live automatically analyzes the audio and finds its transients. These are the points in the audio where notes or events begin, and are usually good places to put Warp Markers. Transients appear as small markers at the top of the Sample Editor after zooming in.

As you mouse over transients, temporary “pseudo“ Warp Markers appear. These have the same shape as regular Warp Markers, but they’re gray. Double-clicking or dragging a pseudo Warp Marker creates an actual Warp Marker or, if there are no Warp Markers later in the clip, changes the tempo for the clip segment. Holding the CTRL(Win) / CMD(Mac) modifier while creating a Warp Marker on a transient also creates Warp Markers at the adjacent transients. Holding the Shift modifier while clicking on a pseudo Warp Marker allows you to drag the transient to a new position. Once a Warp Marker has been created, holding Shift while dragging the Warp Marker will move the waveform beneath the marker, rather than the marker itself.
You can also select a range of time and create Warp Markers at all of the transients within the range via the Create menu’s “Insert Warp Markers“ command. If there are no transients within your time selection, a Warp Marker will be created at the end of the selection.
Although Live usually does a good job of placing transients in the right places, you can delete and create transients as well, via the corresponding commands in the Create menu.
9.2.2.2 Saving Warp Markers
Your Warp Markers will automatically be saved with the Live Set, but you may also want to save them with the sample file itself, so that they are reconstructed anytime you drag the file into Live. To do this, click the Clip View’s Save button (see ‘Saving Default Audio Clip Settings with the Sample’).
Note that if a sample has a saved set of Warp Markers (see ‘Analysis Files (.asd)’), Auto-Warp will have no effect. When this is the case, you can use any of the right-click(Win) / CTRL-click(Mac) context menu commands described in this section to initiate auto-warping.
9.2.3 Using Warp Markers
In the following sections, we will look at a couple of applications for time-warping samples. Warping is, of course, an optional property of clips.
9.2.3.1 Syncing Straight Loops
When you import a sample that represents a well-cut musical loop of 1,2,4 or 8 bars in length, Live usually makes the correct assumptions to play the loop in sync with the chosen tempo. It creates two Warp Markers, one at the sample’s beginning and one at the end.

The Seg. BPM field displays Live’s guess of the loop’s tempo; if you happen to know the tempo of the loop, you can type it in here. Sometimes Live’s guess of the original tempo is wrong by half or double. If so, correct this by clicking on the buttons labeled ×2 and ÷2, respectively. The sample plays at double speed when you press ÷2 because you are changing Live’s interpretation of the sample’s tempo, which serves as a point of reference for determining the required time-stretch factor.
Note that it’s possible to fine-tune the Seg. BPM value by:
- adjusting its slider control in the Audio tab/panel
- or, in the Arrangement, holding Shift while dragging a clip’s edge
9.2.3.2 Syncing Uncut Loops
When importing a loop that has not been edited into a well-cut loop, Live will play it out of sync. Suppose there is a portion of silence at the sample beginning, prior to the first beat. You can easily correct this by placing a Warp Marker at the beginning of the audio and dragging it so that it lines up with the beginning of bar one in the timeline. Likewise, you can eliminate silence after the actual loop end by placing a Warp Marker at the sample’s right edge.
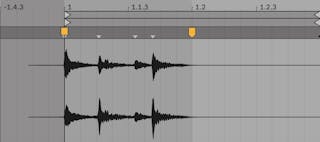
9.2.3.3 Syncing Odd-Length Loops
If you import a sample that contains a seven-bar loop, Live initially assumes the loop is eight bars long (or four, depending on its length) and plays it out of sync. For correct playback, the marker at the end of the sample needs to be at the beginning of bar eight, not bar nine. To fix this, simply drag the ending marker to the correct position.
If Live’s initial guess had been a four-bar loop, the eighth bar may not initially be visible. In that case, you can drag the Warp Marker at the end toward the right until the eight becomes visible.
9.2.3.4 Manipulating Grooves
You can now create any number of Warp Markers by double-clicking within the clip or on transient locations. Drag in a “straight“ looped sample, set a few Warp Markers, and move them around to see what happens. Warp Markers really serve two purposes:
- to provide a “correct“ interpretation of the flow of musical time in the sample;
- to mess up the flow of time in the sample.
If a single event in a percussive audio loop comes late, just pin a Warp Marker to it and drag the marker to the correct beat position. You may want to pin the adjacent events as well, to avoid affecting neighboring regions in the sample.
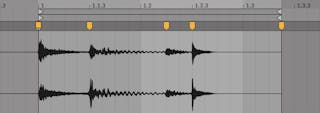
“Removing“ a sample’s natural groove by applying Warp Markers is an interesting creative method, particularly in conjunction with Live’s ability to impose an artificial groove onto clips in real-time (see ‘Using Grooves’).
9.2.3.5 Syncing Longer Pieces
Live’s Auto-Warp algorithm makes longer samples and entire songs readily available for integration into your project. You can use the browser or the Create menu’s Import Audio File… command to import long samples or MP3, AAC, Ogg Vorbis, Ogg FLAC and FLAC files. (Please note that not all of these file formats can be played in the Intro and Lite Editions.)
Note that when using the Import Audio File… command in the Arrangement View, the file will be inserted at the Insert Marker position. When using the command in the Session View, the file will be inserted in the currently selected clip slot.
When you drag an audio file into Live that is too long to justify the assumption that it is a loop or a one-shot, Live will auto-warp the clip by default (though this can be changed in the Record/Warp/Launch Preferences).
Note that, for the auto-warp mechanism to work, files which are being imported into the program for the first time will need to undergo a first-time analysis process and will not be immediately available for playing or editing.
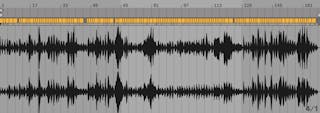
As long as Auto-Warp made the correct set of informed guesses, the clip will be ready to play in perfect sync with the Live Set’s tempo. However, if Auto-Warp does not quite do what you want, you can control its results. The remainder of this section will focus on various ways of guiding Live’s auto-warping. Remember that the metronome in the Control Bar will probably come in handy as you warp longer pieces.

It might happen that Auto-Warp guesses the tempo correctly but gets the downbeat wrong. To remedy this, you can do one of the following:
- Hold the Shift key while dragging the first Warp Marker. This will allow you to adjust the position of the waveform under the Warp Marker.
- Zoom in and create a Warp Marker on the downbeat. Then drag it to the beginning of bar 1 in the timeline;
- Use the start marker’s right-click(Win) / CTRL-click(Mac) context menu to select the Set 1.1.1 Here command.
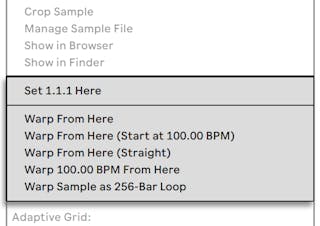
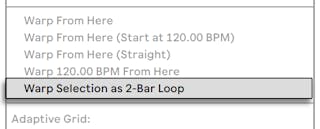
Directing Auto-Warp is also relatively simple when you have imported a perfectly cut loop. You can tell Auto-Warp to work accordingly using the Warp Sample As …-Bar/Beat Loop command. Live will propose a loop length that makes the most sense given the current Live Set’s tempo. Decreasing the Live Set’s tempo can, for instance, lead Live to assume the loop is 8 bars at 90 BPM instead of 16 bars at 180 BPM.
You can also direct Auto-Warp to work on a selected portion of a sample. This is useful if, for example, you’d like to warp and loop an isolated breakbeat from a full song. To do this, first drag in the background of the sample editor to select the part of the sample you’d like to warp. Then use the Warp Selection As …-Bar/Beat Loop command. Live will make its best guess about the correct loop length, set the loop markers to match, and then warp the selection so that it fits in this time.
Sometimes more accurate control of Auto-Warp is necessary. The best way to go about warping a clip that requires more detailed attention is in sections, working gradually from left to right. You can set a Warp Marker by double-clicking in the sample to the right of each correctly warped section, “pinning“ it into place. The shortcuts for working with the clip loop brace and start/end markers can speed up this process considerably (see ‘Clip Gain and Pitch’).
You might also find it helpful to select multiple Warp Markers for moving by selecting them with the Shift or CTRL(Win) / CMD(Mac) modifiers held down.
The four Warp From Here commands provide various ways of resetting Warp Markers to the right of the selected grid marker or Warp Marker, leaving Warp Markers to the left untouched. These commands are also available from the start marker.
- Warp From Here runs the Auto-Warp algorithm on the material to the right of the selected marker.
- Warp From Here (Start At …) directs Auto-Warp to use the current Live Set’s tempo as a starting point for tempo tracking. The strategy here is as follows:
- Deactivate the Warp switch for the clip so that it plays unwarped;
- Use the Control Bar’s Tap Tempo button to tap along, thereby setting the Live Set’s tempo to match that of the clip;
Turn warping on again and use the Warp From Here (Start At …) command to tell Auto-Warp to use your tapped tempo as a reference.
- Warp From Here (Straight) tells Auto-Warp that this is a clip with no tempo variations (common in electronically produced works). Auto-Warp will then set a single Warp Marker derived from its guess of the file’s original tempo.
- Warp … BPM From Here will also set a single Warp Marker, but in this case, Auto-Warp is forced to interpret the clip as exactly matching the Live Set’s tempo. This is useful in cases when you happen to know the exact BPM value of an electronically-produced work and can type it into the Control Bar before warping.
9.2.3.6 Multi-Clip Warping
When clips of equal length are multi-selected, adding or changing Warp Markers for one clip will apply identical Warp Markers to all. This is convenient in any situation where several tracks have the same rhythm, and you wish to alter the timing of each recording in the same way. A common scenario would be when multi-tracking a band’s performance, where the musicians all play in time with each other, yet the timing itself is in some way flawed.
9.2.4 Quantizing Audio
In the previous section, you learned how to adjust the timing of events in audio files by manually dragging Warp Markers along the timeline. But it is also possible to automatically snap the entire sample to the grid at once by using the Quantize command. To do this, click in the background of the sample editor and choose the Quantize command from the Edit menu, or use the CTRL(Win) / CMD(Mac) hotkey. This will quantize using default settings, or the settings that you previously applied.
To adjust your quantization parameters, open the Quantization Settings dialog from the Edit menu.
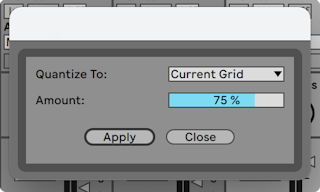
Using the options presented here, you can select either the current grid size or a specific meter value for quantization. You can also quantize without that “quantized“ feel by adjusting the Amount control, which will move Warp Markers by a percentage of the set quantization value.
9.3 Adjusting for Good Stretching Quality
Live offers a number of time-stretching modes to accommodate all sorts of audio material. Each clip’s time-stretching mode and associated parameters are set in the Clip View’s Audio tab/panel.
The warp modes are different varieties of granular resynthesis techniques. Granular resynthesis achieves time compression and expansion by repeating and skipping over parts of the sample (the “grains“). The warp modes differ in the selection of grains, as well as in the details of overlapping and crossfading between grains.
Let’s investigate which warp modes work best for different types of signals and how to adjust the warping controls for “clean“ stretching. It’s also fun to “misuse“ these controls to achieve interesting artifacts instead of accurate stretching.
9.3.1 Beats Mode
Beats Mode works best for material where rhythm is dominant (e.g., drum loops as well as most pieces of electronic dance music). The granulation process is optimized to preserve transients in the audio material.
Use the Preserve control to preserve divisions in the sample as boundaries when warping. For the most accurate results, particularly with percussive material, choose Transients. This setting uses the positions of the analyzed (or user-created) transients to determine warping behavior. To preserve specific beat divisions regardless of the sample’s contents, choose one of the fixed note values. For some interesting rhythmic artifacts, choose large note values in conjunction with pitch transposition.
The Transient Loop Mode chooser sets the looping properties for the clip’s transients:
 Loop Off — Each segment of audio between transients plays to its end and then stops. Any remaining time between the end of a segment and the next transient will be silent.
 Loop Forward — Each segment of audio between transients plays to its end. Playback then jumps back to a zero-crossing near the middle of the segment and continues looping until the time when the next transient occurs.
 Loop Back-and-Forth — Each segment of audio between transients plays to its end. Playback then reverses until it reaches a zero-crossing near the middle of the segment, and then proceeds again towards the end of the segment. This pattern continues until the time when the next transient occurs. This mode, in conjunction with the Preserve Transients selection, can often result in very good quality at slower tempos.
The Transient Envelope slider applies a volume fade to each segment of audio. At 100, there is no fade. At 0, each segment decays very quickly. Long envelope times can help to smooth clicks at the end of segments, while short times can be used to apply rhythmic gating effects.
9.3.2 Tones Mode
Tones Mode serves well for stretching material with a more or less clear pitch structure, such as vocals, monophonic instruments and basslines.
Grain Size provides rough control over the average grain size used. The actual grain size is determined in a signal-dependent manner. For signals with a clear sense of pitch contour, a small grain size works best. Larger grain sizes help avoid artifacts that can occur when the pitch contour is unclear, but the trade-off can be audible repetitions.
9.3.3 Texture Mode
Texture Mode works well for sound textures with an ambiguous pitch contour (e.g., polyphonic orchestral music, noise, atmospheric pads, etc.). It also offers rich potential for manipulating all kinds of sounds in a creative way.
The Grain Size control determines the grain size used, but unlike in Tones Mode, this is a setting that Live will use unaltered, without considering the signal’s characteristics.
Fluctuation introduces randomness into the process. Larger values give more randomness.
9.3.4 Re-Pitch Mode
In Re-Pitch Mode, Live doesn’t really time-stretch or compress the music; instead, it adjusts the playback rate to create the desired amount of stretching. In other words, to speed up playback by a factor of 2, it’s transposed up an octave. This is like the “DJ stretching method“ of using variable-speed turntables to sync two records, or what happens to samples in traditional samplers when they’re transposed.
The Transpose and Detune controls have no effect in Re-Pitch Mode.
9.3.5 Complex Mode
Complex Mode is a warping method specifically designed to accommodate composite signals that combine the characteristics covered by other Warp Modes; it works well for warping entire songs, which usually contain beats, tones and textures.
Complex Mode is a rather CPU-intensive function, using approximately ten times the CPU resources required by the other Warp Modes. As such, you may want to freeze tracks (see ‘Track Freeze’) where Complex Mode is used or record (see ‘Recording New Clips’) the results as a new clip to use as a substitute.
9.3.6 Complex Pro Mode
Complex Pro Mode uses a variation of the algorithm found in Complex mode, and may offer even better results (although with an increase in CPU usage.) Like Complex Mode, Complex Pro works especially well with polyphonic textures or whole songs.
The Formants slider adjusts the extent to which the formants of the sample are compensated when transposing. At 100%, the original formants will be preserved, which allows for large changes in transposition while maintaining the sample’s original tonal quality. Note that this slider has no effect if the sample is played back untransposed.
The Envelope slider also influences the spectral characteristics of the material. The default setting of 128 should work well for most audio. For very high-pitched samples, you may have better results with lower Envelope values. Likewise, low-pitched material may sound better with higher values.
9.3.7 REX Mode
REX Mode differs from the other Warp modes in several ways. Most notably, it is not available as an option in the Clip View’s Audio tab/panel, but is instead enabled automatically when loading a file in REX format. REX files, associated with the program ReCycle by Propellerhead Software, contain embedded tempo and timing information and will synchronize to your Set’s tempo just like any other audio file.
Although REX files are audio files, they can quickly be transformed into playable instruments via the Slice to New MIDI Track command (see ‘Slice to New MIDI Track’), which is available in the Create Menu or the right-click(Win) / CTRL-click(Mac) context menu for the clip.
Warp Markers/parameters, Clip Envelopes (see ‘Clip Envelopes’) that affect warping properties, and the Clip Nudge (see ‘Clip Offset and Nudging’) controls are not available for REX files.
Please note that REX file support is not available in the Intro and Lite Editions.